This step shows how to make sure the buoyancy tank areas of the Oz Goose are completely sealed with epoxy including the underside of the decks before gluing the decks down.
This will be a long session with a lot of work done. Though you can stop after the dry fit.
NOTE – VIDEO IS INCOMPLETE.
The Video covers the
DRY FIT OF THE DECKS ONLY.
When the decks are dry fitted read the below for full method after the dry fit …
- Dry fit decks without using glue using a few temporary screws.
- Remove decks
- Coat underside decks and any bare timber in tanks
- When coating is tacky add second coat epoxy
- Immediately make up a glue mix and put on framing of hull
- Screw down decks into original screw holes and add more temporary screws or bronze boat nails as specified
Check the hull is not twisted
CHECK HULL IS NOT TWISTED
So check the twist regularly through this process as we showed you before
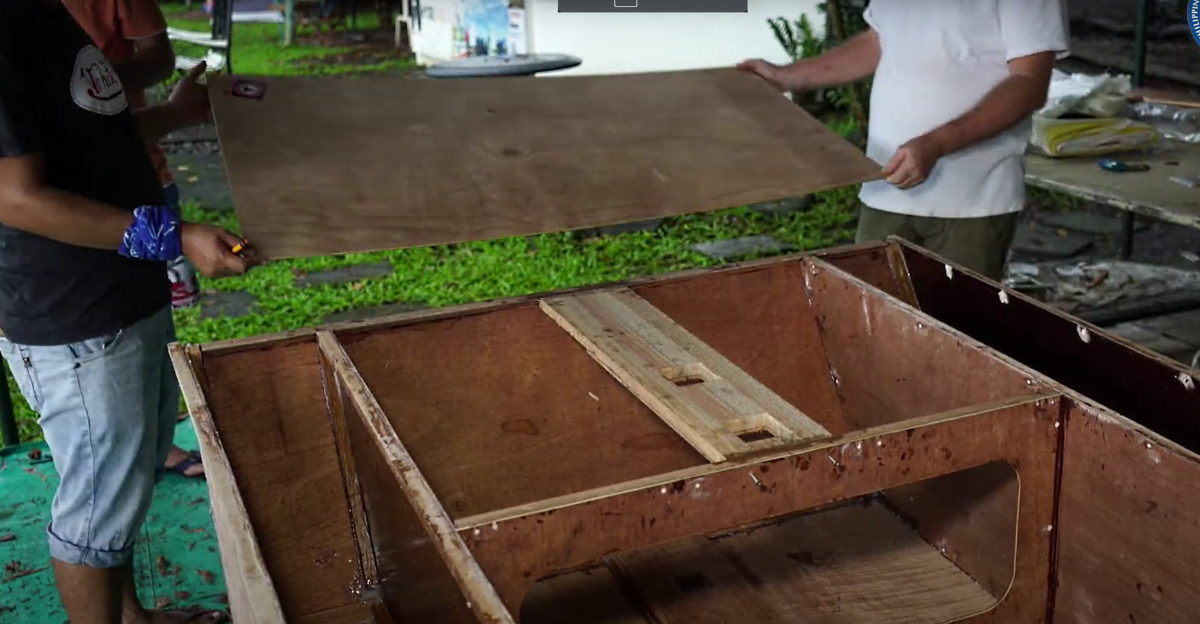
Dry fit the Foredeck
This is the first step where twist gets locked into the hull SO CHECK!
Check the measurement between the hull side and the tank face at the bow transom. Write this number down.
The back edge of the deck is lined up with the back edge of the cockpit bulkhead and one screw (black screw, drywall, plasterboard screw) is put into the back left corner into the gunwale to hold the side panel.
Then push the side panel so the measurement you wrote down to get the same gap on the left side of the foredeck. Put one screw into the tank face cleat. asdfklasdlfjalsdjflk
Put three screws into the top of the cockpit bulkhead cleat to hold the foredeck exactly in line with its back edge.
Go to the right side of the boat. Move the side panel so the distance between it and the tank face match the other side of the boat.
THE FOREDECK PLYWOOD IS TOO BIG. SO SIDE TWO IS TRIMMED LATER
The foredeck is dry fitted. Write TOP on the top face and FRONT at the front
CHECK BOAT IS UNTWISTED
Put 3 temporary screws into the front of the foredeck – they will have to be angled to match the bow transom.
Dry Fit the side decks
Make sure the butt strap that will join the side deck to the foredeck is fitted. It goes to the front
The inside edge of the side deck is used to pull the tank faces perfectly straight so the boat looks professionally built.
Just 3 or 4 screws are needed to hold the inside edge of the deck line up with the tank face.
We worry about the outside edge later.
WRITE LEFT AND RIGHT ON THE DECKS WITH PENCIL
Lay out the Decks and Give a brush a haircut and clean up a squeegee
As you did with the coating the outside of the boat give a brush a haircut and clean any epoxy blobs from the squeegee.
Lay out the sidedecks and foredeck on the flat with the underside upwards. Not in direct sunlight or the epoxy will harden too quickly. Put plastic on the floor or ground underneath if you don’t want epoxy drips.
One Hit Epoxy Coat and glue
This method is not covered in the Video!!!
In this Section We Introduce one of the Great Boatbuilding techniques,
ONE HIT EPOXY COAT AND GLUE
Read all the instructions Below!
The idea of the one-hit method is to avoid any sanding or other labour simply by coating the areas that will be inside the air tanks either side of the boat and then assemble them while the second coat of epoxy is still wet. Read on.
ONE HIT METHOD – STEP 1 – COAT BARE TIMBER THAT WILL BE INSIDE TANK AND UNDERSIDE DECKS
First Coat epoxy – on Underside Decks and any bare timber in the tank area
All areas that will be inside the tank need to be coated. So look for any bare timber inside the tank and brush with epoxy. This area will be unseen … so you can be quick as tidiness doesn’t matter.
Immediately pour out the epoxy in long puddled on the underside of the decks. Spread them with the squeegee. Finish off the coating with the brush.
Now wait for the epoxy on the decks to go tacky. Have a break, It will take half an hour to an hour and a half. Check regularly as when it gets tacky/sticky the next coat has to happen immediately.
Second Coat epoxy – on Underside Decks and any bare timber in the tank area
When the first coat is tacky/sticky, mix the epoxy for the second coat and apply to the same areas.
Go onto the next step immediately. You have done the ONE HIT COATING – now for ONE HIT GLUING
LAST CHANCE – MAKE SURE BOAT IS UNTWISTED
VIDEO IS CORRECT FROM THIS POINT.
ONE HIT METHOD – STEP 2 – CHECK FOR LEAKS AND GLUE THE DECKS DOWN.
Make up a glue mix – mayonnaise thickness. Use the bag method to apply glue to the tops of bulkheads, the gunwale and the cleat on the top of the side tank.
Next, it is time to use any leftover glue. Have a look in the corners of the tank area for any points where there may be gaps – at the bottom and the corners where the deck will go on. Use the bag to build up epoxy in the areas of the gaps. It doesn’t take a lot of epoxy to close the gap. Epoxy as thick as the plywood is more than strong enough.
If not any leftover glue then spread the glue for the decks using a glue stick and spread like butter over the surface.
Any glue left on the glue stick can be used to close up any possible leaks – do all filling from inside the tank. If some comes through to outside clean it up with a chisel edge glue stick.
Screw down the decks Following the Dry fit process
Put the screws into the same holes in the same order as the dry fit process. Check the size of the overlap at the deck edge when putting the screws in.
Now, Hammer nails into the Mast partner area. Don’t smash the nails (if using nails – otherwise screws) in … hammer in gently so the small dry glue bonds holding the partner in are not broken. Look under the deck and check that there are not gaps between the partner and the ply.
With the three day FBW builds we supply nails as nails allow rushing to the next section of work in the three day program. Nail spacing is about 300mm (1 foot). Nail tops MUST be flush with the ply surface and not stand up.
Everyone else can use black screws on about 400mm centres.
Whether using screws or nails check the join after to see if there are any gaps Put in extra nails or screws to close up any gaps.
Nails must be hammered flush with the plywood and not stick up higher. Black screws can usually be removed the next day after checking the epoxy feels hard and not rubbery.
Fit the Coaming.
The coaming is a piece of timber that prevents water landing on the bow of the boat from coming into the cockpit.
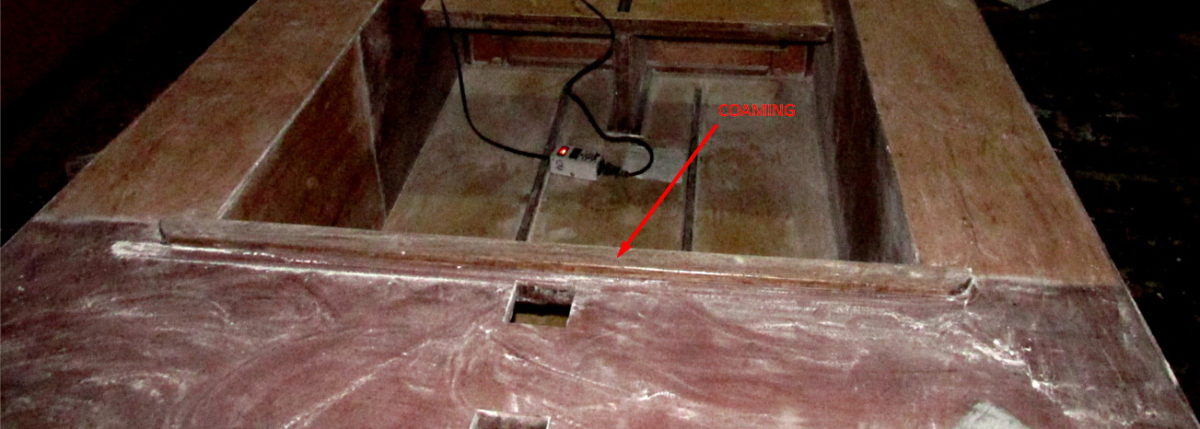
For kit builders it will be included already. Do a dry fit then glue on using four temporary screws. One good trick is if the timber is not quite straight put the concave side down.
For those cutting their own timber and ply the dimensions and shape are in the plan.
The back edge of the coaming matches the back edge of the foredeck exactly.
Dry fit and then glue it down.
Clean up excess glue – you will thank me!
Hard Epoxy glue is really hard to sand. So fix it up while it is soft.
Make up a chisel edge glue stick and go around and clean up all the excess epoxy. There are not many places to use it up so the best place is NOT ON THE BOAT. If there is really a gap to fill that can’t be fixed with an extra screw or nail. then it is ok to fill it.